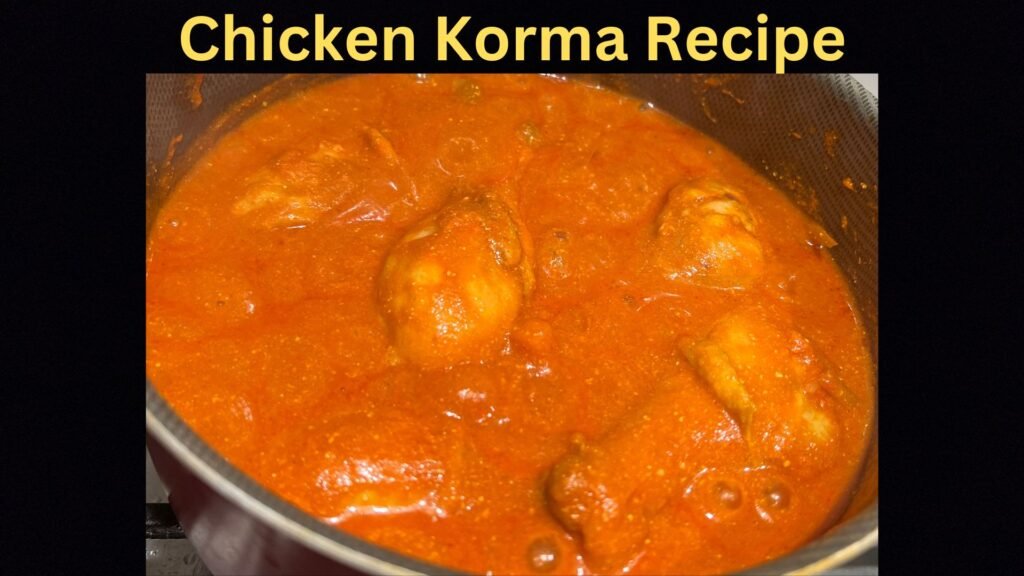
How to Make Chicken Korma Curry: Step by Step
If you love rich and creamy curries, learning how to make chicken korma is a must! This dish is packed with flavors from aromatic chicken korma ingredients like yogurt, nuts, and fragrant spices. Our korma chicken recipe is easy to follow, ensuring you get tender chicken in a luscious, flavorful sauce. Whether you’re cooking for a special occasion or a comforting meal, this guide will help you how to make chicken korma curry at home. Get ready to enjoy a restaurant-quality dish right from your kitchen! How to Make Chicken Korma Curry: Beginners Guide Among Indian cooking chicken Korma is everyone’s favorite dish. Chicken korma is rich and creamy with a great spice blend. It features juicy chicken in a rich gravy. Also, you need to add garam masala, yogurt, nuts and occasionally a spoonful of coconut milk. This article is a step-by-step guide about how to make Chicken Korma curry for both expert chefs and beginners cooking for the first time. “This article contains affiliate links. I might get commissions from those links if you click through the link and finalize a purchase. Please read Disclosure section for more information.” Understanding How to Make Chicken Korma Curry Chicken Korma is a unique dish in the wide range of Indian curries. It has a mild flavor and a smooth texture. Unlike othercurries that can be very spicy, Chicken Korma combines fragrant spices with a creamy sauce. This makes it both cozy and fancy. Even though it has a rich taste, Chicken Korma is easy to make for anyone. The ingredients are easy to find, and the cooking steps are clear. This makes it a great option for weeknight meals or special events. The History and Origin of Chicken Korma Chicken Korma’s history goes back to the Mughal era in India, around the 16th century. This dish likely started in the royal kitchens of the Mughal emperors. They were famous for their grand feasts and rich meals. This tasty and creamy curry was usually served during special events and for important guests. It showed off the luxury and greatness of the Mughal court. The word “korma” is derived from the Urdu word “korma,” meaning “to braise.” This is how the dish was prepared. Chicken Korma is still very famous in India also loved across the world. It’s an increasingly common presence on the menus of many Indian restaurants and curry houses. Its enduring popularity lies in its precise balance of flavors and textures, which is a hallmark of all of Indian food. Why Chicken Korma is a Beloved Dish in Indian Cuisine Chicken Korma is a favorite dish in Indian food. People love it for its rich flavor and creamy texture. This great taste comes from a mix of special spices and rich ingredients. Garam masala is one important spice in Indian recipes. It adds warmth and depth. The yogurt and nuts used in the dish also make a smooth and tasty sauce. One reason Chicken Korma is so popular is because it can be changed to fit personal tastes and diets. You can change how spicy it is. There are also vegetarian options, where you can use vegetables or paneer instead of chicken. These are just as tasty. Whether it’s for a family dinner or a special event, Chicken Korma is a must-have. It stays a beloved choice in Indian cooking traditions. Preparing How to Make Chicken Korma Curry Before you start cooking Chicken Korma, it’s important to gather the right ingredients and tools. This will make cooking easier and let you enjoy making this tasty Indian dish. You need key spices and the right kind of chicken for the best results. Having everything ready helps your cooking experience be fun and satisfying. Now, let’s look at what you need for a truly authentic and delicious Chicken Korma. Essential Ingredients for Authentic Korma Chicken Recipe Chicken Korma is a flavorful and aromatic dish that requires a blend of various spices and ingredients to achieve its rich taste. To make Chicken Korma, you will need the following chicken korma ingredients along with their respective amounts: These ingredients come together to create a creamy and indulgent Chicken Korma that is sure to delight your taste buds with its complex flavors and tender chicken pieces in a luscious sauce. As I always say, the key to a delicious Chicken Korma is in selecting the right ingredients. The mix of ingredients, of course, will vary based on location and tastes, but some main ones will always be in the mix. Garam masala, a blend of ground spices, provides the overpowering aroma and flavor of the korma. Ground almonds are key, as well: They thicken the curry and give it a nutty flavor. Whole spices, such as cardamom pods, sticks of cinnamon and cloves, give the dish warmth and subtlety. Apart from these core ingredients, yogurt, cream or coconut milk, onions, ginger, garlic, and green chilies do their magic in giving Chicken Korma a such creamy texture and a balanced flavor. Selecting the Right Type of Chicken The chicken you choose can alter the direction of your Chicken Korma. Bone-in chicken thighs provide more flavor, while boneless chicken breast cooks quicker and is leaner. This recipe works best with boneless chicken, such as breast or thigh meat, that’s been cooked in olive oil. It cooks quickly and absorbs the flavors of the korma sauce nicely. If using chicken breast, dice into small cubes. That allows it to cook through evenly and soak up the creamy korma sauce. Bone-in chunks of chicken are delicious, but they require longer cooking time to be fully cooked. Ultimately, your decision depends on your preferences and the amount of time on your hands. But regardless of what kind you use, some good, fresh chicken will definitely make your chicken curry taste so much better. Kitchen Tools and Equipment Needed for How to Make Chicken Korma Curry You don’t need a swanky kitchen to make delicious Chicken Korma. But the right tools can help make it easier and more enjoyable. You do not need a food processor, but it makes a huge difference. It can assist in getting a
How to Make Chicken Korma Curry: Step by Step Read More »